
Introduction
Docker is a great way to run applications. It will keep it separate from the rest of your system and you’re running in the same environment regardless of the system hosting the container.
Traefik is a Docker-aware reverse proxy with a monitoring dashboard. Traefik also handles setting up your SSL certificates using Let’s Encrypt allowing you to securely serve everything over HTTPS.
Portainer is a web interface for managing Docker. This allows you to easily start/stop/restart your docker containers, manage their settings, or add more containers in the future.
Prerequisites
To follow along with this tutorial, you will need the following:
- A Debian based server - I recommend using Ubuntu 20.04.
- Check out the fvtt-docker/README.md if you need some server hosting recommendations.
- A non-root user, currently logged in, with sudo access
- Basic understanding of how to use the Linux command line
- A domain with three A records, each pointing to your servers IP address. I recommend, and for the tutorial will be using the following:
monitor,manage,play. You’re free to use any A records you wish, just modify the steps below as appropriate.
Tutorial
Note
Throughout the tutorial, I will use nano as the text editor as I find it’s the most friendly to newer users. You’re welcome to use whatever editor you prefer.
Saving and Exiting with nano
CTRL+X- Press
Y- to save modifications Enter
Step 1 - Setting up your server
Note: You should be connected to your server via SSH or PuTTY - not using a web console from your hosting provider as pasting content doesn’t work well through web-based consoles.
This section will assume you’re running as a non-root user, with sudo permissions.
If you are running as root and do not have a regular user, run the follow commands to create one, replacing USERNAME with your desired username:
adduser USERNAME
usermod -aG sudo USERNAME
su - USERNAME
The last command will have switched you to your newly created user. You’re now ready to continue with the tutorial.
Installing the required packages:
Use the following command to install all of the required packages:
sudo apt update && sudo apt install apache2-utils docker.io docker-compose
Start docker and enable it to start on reboot
sudo systemctl enable --now docker
Setup your firewall - we will only allow traffic to the server over SSH, HTTP and HTTPS.
sudo ufw allow 22
sudo ufw allow 80
sudo ufw allow 443
sudo ufw enable
When you enable ufw there will be a warning that your SSH connection may get closed. It shouldn’t actually get closed as we’ve left port 22 open.
Last up, we need to give your user access to the docker group, with these last 2 commands.
sudo usermod -aG docker $USER
newgrp docker
Step 2 - Configuring and Running Traefik
Generating a secure password. In the command below, substitute secure_password with the actual password that you want to use.
htpasswd -nb admin secure_password
The output will look something like this:
admin:$apr1$ruca84Hq$mbjdMZBAG.KWn7vfN/SNK/
If your string has any $ you will need to modify them to be $$ - this is because docker-compose uses $ to signify a variable. By adding $$ we still docker-compose that it’s actually a $ in the string and not a variable.
Take note of the output, we will need it near the end of this step.
Next up, we will start creating our config files. I recommend making a separate directory for each container. So, let’s make a folder and switch into it.
mkdir traefik && cd traefik
Now, let’s make our config file and start to edit it
nano traefik.yml
Copy and paste the following into your editor.
api:
  dashboard: true

entryPoints:
  http:
    address: ":80"
  https:
    address: ":443"

providers:
  docker:
    endpoint: "unix:///var/run/docker.sock"
    exposedByDefault: false

certificatesResolvers:
  http:
    acme:
      email: email@example.com
      storage: acme.json
      httpChallenge:
        entryPoint: http
Modify the email address from email@example.com to a valid email address. This is used for generating your SSL certificates.
Save and exit your editor (for nano check the Notes section above on how to Save & Exit)
On the topic of SSL, we’re going to need a file for our SSL information to be stored and persisted outside of the container. Let’s create that file now.
touch acme.json
Let’s lock down the permissions on this file so other users can’t read it.
chmod 600 acme.json
Up next is the docker-compose configuration.
nano docker-compose.yaml
Same as before, copy/paste the contents below into your editor and get ready to make a few modifications.
version: '3'

services:
  traefik:
    image: traefik:v2.0
    container_name: traefik
    restart: unless-stopped
    security_opt:
      - no-new-privileges:true
    networks:
      - proxy
    ports:
      - 80:80
      - 443:443
    volumes:
      - /etc/localtime:/etc/localtime:ro
      - /var/run/docker.sock:/var/run/docker.sock:ro
      - ./traefik.yml:/traefik.yml:ro
      - ./acme.json:/acme.json
    labels:
      - "traefik.enable=true"
      - "traefik.http.routers.traefik.entrypoints=http"
      - "traefik.http.routers.traefik.rule=Host(`monitor.yourdomain.com`)"
      - "traefik.http.middlewares.traefik-auth.basicauth.users=admin:$apr1$ruca84Hq$mbjdMZBAG.KWn7vfN/SNK/"
      - "traefik.http.middlewares.traefik-https-redirect.redirectscheme.scheme=https"
      - "traefik.http.routers.traefik.middlewares=traefik-https-redirect"
      - "traefik.http.routers.traefik-secure.entrypoints=https"
      - "traefik.http.routers.traefik-secure.rule=Host(`monitor.yourdomain.com`)"
      - "traefik.http.routers.traefik-secure.middlewares=traefik-auth"
      - "traefik.http.routers.traefik-secure.tls=true"
      - "traefik.http.routers.traefik-secure.tls.certresolver=http"
      - "traefik.http.routers.traefik-secure.service=api@internal"

networks:
  proxy:
    external: true
Replace monitor.yourdomain.com with your own domain on the following lines:
- "traefik.http.routers.traefik.rule=Host(`monitor.yourdomain.com`)"
- "traefik.http.routers.traefik-secure.rule=Host(`monitor.yourdomain.com`)"
Replace the auth information from the first command we ran, in this Step, on this line:
- "traefik.http.middlewares.traefik-auth.basicauth.users=admin:$apr1$ruca84Hq$mbjdMZBAG.KWn7vfN/SNK/"
Save and exit your editor.
We’re nearly there. Now we need to create the docker network with a quick command.
docker network create proxy
With that done, we’re ready to start our Traefik container.
Step 3 - Running the Traefik Container
Alright, we did all the heavy lifting for Traefik in Step 1. Time to start the container.
docker-compose up -d
This will build the docker container and start it up.
In your web browser, you should now be able to navigate to your Traefik monitoring page. You will be prompted to log in with the secure_password you used at the start of Step 1. In your browser, replace yourdomain.com with your domain to login.
https://monitor.yourdomain.com
Step 4 - Configuring and Running Portainer
Assuming you’re still where we left off, let’s go back up 1 level of our directory path, create a new directory for portainer, and switch into it.
cd .. && mkdir portainer && cd portainer
Portainer will create a fair number of files and directories that it needs to persist between runs. Let’s make a directory for all that.
mkdir data
Now, we’re going to create our docker-compose config file.
nano docker-compose.yaml
Copy/paste the contents below. We have 2 lines to modify after.
version: '3'

services:
  portainer:
    image: portainer/portainer:latest
    container_name: portainer
    restart: unless-stopped
    security_opt:
      - no-new-privileges:true
    networks:
      - proxy
    volumes:
      - /etc/localtime:/etc/localtime:ro
      - /var/run/docker.sock:/var/run/docker.sock:ro
      - ./data:/data
    labels:
      - "traefik.enable=true"
      - "traefik.http.routers.portainer.entrypoints=http"
      - "traefik.http.routers.portainer.rule=Host(`manage.yourdomain.com`)"
      - "traefik.http.middlewares.portainer-https-redirect.redirectscheme.scheme=https"
      - "traefik.http.routers.portainer.middlewares=portainer-https-redirect"
      - "traefik.http.routers.portainer-secure.entrypoints=https"
      - "traefik.http.routers.portainer-secure.rule=Host(`manage.yourdomain.com`)"
      - "traefik.http.routers.portainer-secure.tls=true"
      - "traefik.http.routers.portainer-secure.tls.certresolver=http"
      - "traefik.http.routers.portainer-secure.service=portainer"
      - "traefik.http.services.portainer.loadbalancer.server.port=9000"
      - "traefik.docker.network=proxy"

networks:
  proxy:
    external: true
Modify the two lines below, replacing yourdomain.com with your domain.
- "traefik.http.routers.portainer.rule=Host(`manage.yourdomain.com`)"
- "traefik.http.routers.portainer-secure.rule=Host(`manage.yourdomain.com`)"
With that done, we’re ready to start the Portainer container.
Step 5 - Running the Portainer Container
Exactly the same as starting the Traefik container, we’re going to run:
docker-compose up -d
Now, if you browse to https://manage.yourdomain.com (replacing yourdomain.com with your domain) you will be prompted to set up your login information.
On the screen asking you to Connect Portainer to the Docker environment you want to manage, select Local and press Connect.
We will use Portainer to set up and manage FoundryVTT
Step 6 - Configuring and Running FoundryVTT
Alright, we’re nearly there. For this next step, make sure you’ve downloaded the latest (linux) version of FoundryVTT zip file to your server. You don’t need to worry about unzipping it. I highly recommend storing it in its own directory, as the only file, and deleting it and replacing whenever a new version comes out.
If you have multiple FoundryVTT zip files in this directory, your docker deployment will break.
I will be storing mine in my users home directory in a folder called foundrydl. Please take note of where you store yours as we will need the folder name later.
We have 1 more console command to run before we get into using Portainer. We’re going to create a data directory for Foundry to store it’s data. Go ahead and run this command:
mkdir /home/$USER/foundrydata
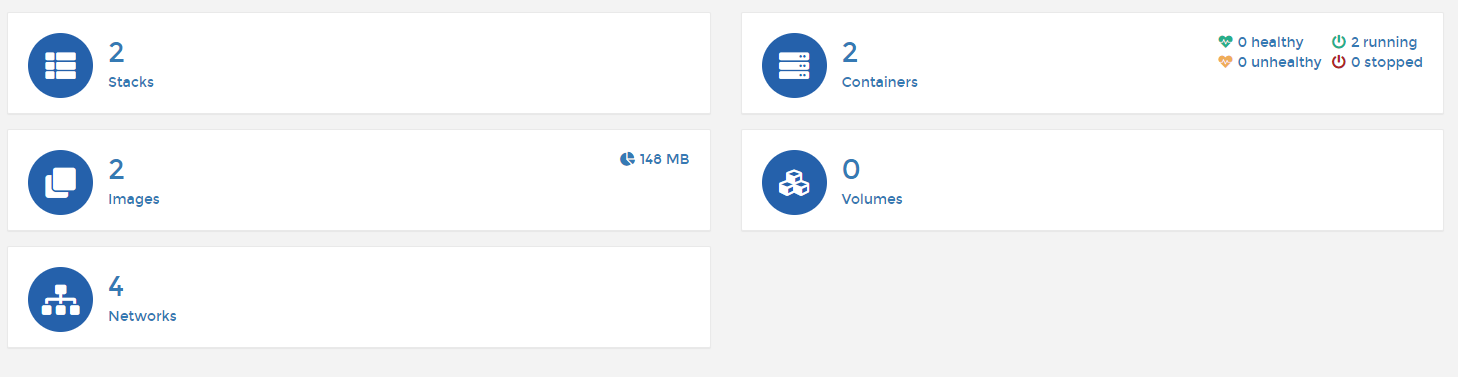
Once you’ve logged into Portainer, you should see something that looks like the image below.

Go ahead and click on the only group on the page, called local. Here’s the next screen you’ll see.
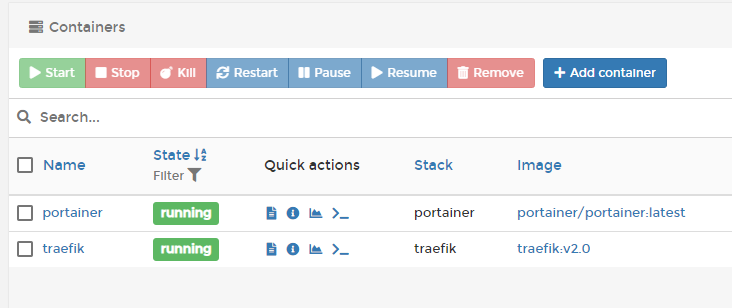
Next, you’ll want to click on where it says 2 Containers. This next page is where you’ll see all of your running containers. Go ahead and click the Add Container button at the top of this page.
Go ahead and give your container a name. I will choose fvtt but you’re welcome to call it anything you want.
In the Image field, enter direckthit/fvtt-docker:latest.
The top part of your settings should look like the image below. Don’t hit Deploy the container just yet. We still have some more settings to add.

Scroll down to the Advanced container settings at the bottom of the page.
Under Command & logging enter the following into Entry Point: /opt/foundryvtt/run-server.sh
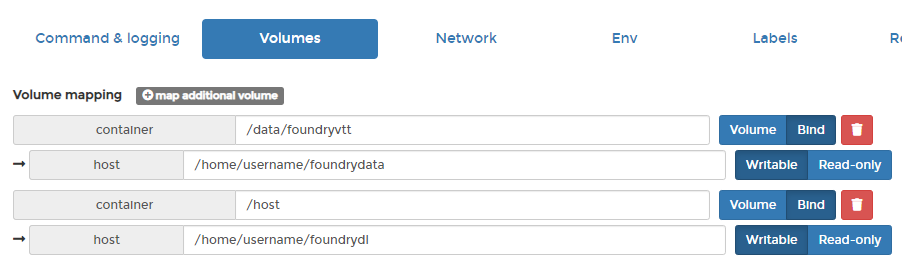
Next, click on the Volumes tab. Currently, you won’t see any volumes mapped. Go ahead and hit the map additional volume button.
In the container field, enter /data/foundryvtt. Right next to where you entered that, change the toggle from Volume to Bind. The next line should now say host.
The volume we’re currently adding is where Foundry will store all of your data, including your worlds, modules and uploaded images. At the start of this step we created this folder in our home directory. You’ll have to modify the path below to replace username with your users’ actual username.
In the host field enter /home/username/foundrydata. Don’t worry if the folder doesn’t exist - docker can handle that.
Next, we’re going to map our download directory (you’ll remember, above, that I’m using foundrydl as my folder). You’ll have to modify your path to match where you’ve saved your zip file. Let’s go ahead and hit that map additional volume button again.
For the newly created volume, enter the following in the container field: /host.
Just like before, hit the toggle to switch from Volume to Bind.
In the host filed, enter the path to where you’ve saved your zip file. For me, it will be /home/username/foundrydl.
When you’re done, your volumes should look something like this image.
Next up is adding the container to the right network. If you haven’t already guessed, you’re going to want to go ahead and hit the Network tab.
In the first field, Network, expand the dropdown and select proxy. You don’t need to change anything else on this tab. Here’s what your Network tab should look like:

Next, we’re going to jump ahead a little bit. Go over and click on the Restart policy tab. On this tab, change your Restart policy to Unless stopped. This will allow the container to automatically restart if it crashes.

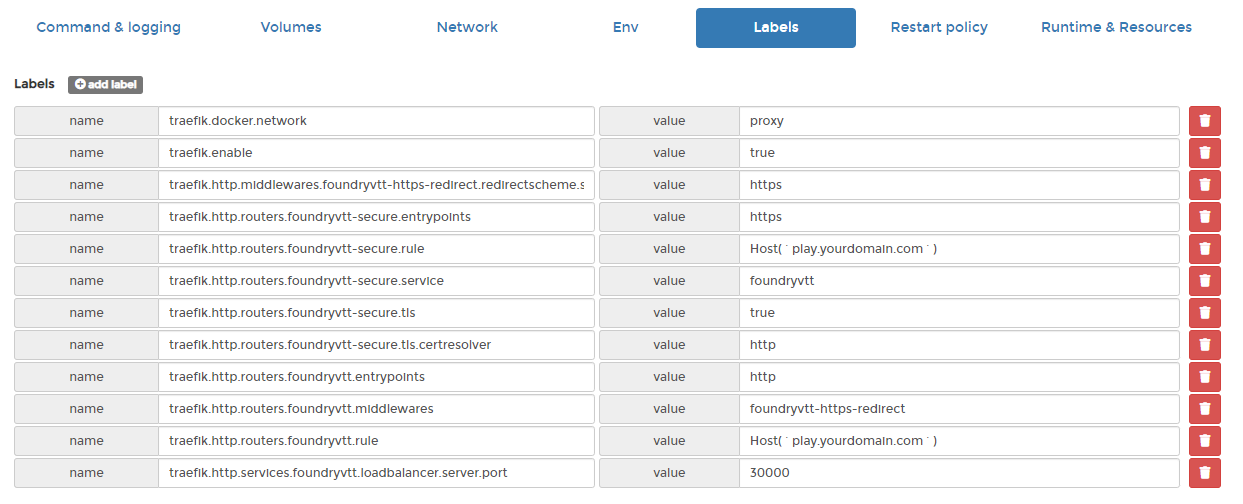
Alright, one more tab to set up. I want to tell you that I saved the easiest for last. But, the reality is, I saved the longest one for last… Head on over the the Labels tab.
To add a label, you’re going to want to hit the add label button. Below you’ll find the list of all the labels you want to add. Be sure to change yourdomain.com to your actual domain.
| Name | Value |
|---|---|
| traefik.docker.network | proxy |
| traefik.enable | true |
| traefik.http.middlewares.foundryvtt-https-redirect.redirectscheme.scheme | https |
| traefik.http.routers.foundryvtt-secure.entrypoints | https |
| traefik.http.routers.foundryvtt-secure.rule | Host(`play.yourdomain.com`) |
| traefik.http.routers.foundryvtt-secure.service | foundryvtt |
| traefik.http.routers.foundryvtt-secure.tls | true |
| traefik.http.routers.foundryvtt-secure.tls.certresolver | http |
| traefik.http.routers.foundryvtt.entrypoints | http |
| traefik.http.routers.foundryvtt.middlewares | foundryvtt-https-redirect |
| traefik.http.routers.foundryvtt.rule | Host(`play.yourdomain.com`) |
| traefik.http.services.foundryvtt.loadbalancer.server.port | 30000 |
Once you’re done, it should look something like this:
Now you can go ahead and hit the Deploy the container button. Your container should now start up (it might take a minute) and you should be able to browse to https://play.yourdomain.com (replacing yourdomain.com with your domain) and find your freshly installed copy of Foundry VTT.
(Optional) Step 7 - Enabling Audio/Video Support
If you intend to use the built in audio/video support for Foundry and not another tool such as Discord, there’s one last step required.
First up, from the Portainer containers dashboard, select your Foundry container, and stop it.

Back in your SSH terminal, now that the container has been stopped, we’re going to edit one config file. Let’s use the following command to edit the config file in nano (as always, feel free to use your preferred editor):
sudo nano /home/$USER/foundrydata/Config/options.json
Look for the line that says proxySSL and change the value from false (or null, depending on your version) to true. Then you can save and exit nano.
Back in the Portainer containers dashboard, you can restart your Foundry container.
If you found this tutorial helpful and would like to show your appreciation, please consider becoming a Patron.